jayrq2o1
New member
Don't wanna wait at the dealer for them to either tell you its normal or spend two hours sitting around while you wait in line for them to fix it? Well, here's how to change them yourself. The parts can be purchased at gmpartsdirect or even your local dealership. They're around 15ish a piece. Also, I find it enjoyable to work on my car, despite it being an unnecessary fix, its quite simple.
If you carefully read this guide for three hours and don't mind spending your own money, then the process should take less than an hour to do yourself.
Or if you're cheap, then its probably best to argue with the service writer until they finally agree to fixing it.
As a side note, I've found on some other posts that cruze links (including ISM's adjustable ones) should work on our cars. The center to center measurement is off by millimeters at most and under a centimeter.
Okay, here's the excerpt from my blog.
Ah, February. What a wonderful month (not really). Slowly, the days get longer and begins to warm us up for the coming of Spring. Time for a nice drive (commute) to work. WHAT THE F*CK IS ALL THAT STUPID NOISE???!?
Turns out from some research, a minority of Sonics suffer from sever stabilizer bar link problems. Either full opting the wheel or taking a corner at moderate speed (not even), they wear prematurely and start clanking and clinking like a piece o sh*t Korean car.
So, like any car guy, I bought the parts and set aside a weekend to work on it, today actually which kind of makes this a March post. The problem really made itself known in February however. Before that, even as recently as January, it was a noise that I only heard now and then.
Anyway, I just got home and I'm happy to report that the sound is completely gone and the problem alleviated. The following is a bunch of pictures and some light instruction if you find this problem happening to you.

On the left is the new one. Its a little hard to tell, but the used one on the right is nearly devoid of all grease on the lower ball joint with the upper going as well.

Did you decide to take it to your dealer to get it fixed? If you're wondering why it took 2+ hours, its likely this sh*tty ball joint stud. The torx part gets so dirty with rust, that's what made my job take so long. The upper ball joint that mounts to the strut doesn't get this bad. It might have to do with it being stainless.

Here's the top nut. The plastic ring in the center means its self locking. The bottom doesn't have this; it will however take a little bit of muscle to tighten it onto the stud. It may also be a self locking nut, but instead of a plastic ring, it uses an offset thread.
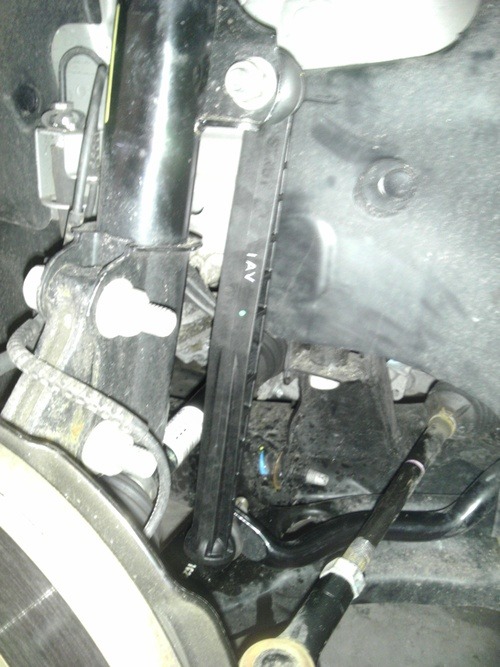
Here's where you'll find the stabilizer bar link, just aft of the wheel hub. It will be difficult to remove without a second jack if not impossible. The easiest way to remove it is to remove the top nut first. If you can't take it off, just get it loose until the ball joint stud ****s. Place the second jack under the lower control arm, preferably directly under the wheel hub. Jack it until you can freely move the threaded part. It should be much easier to remove after you've relieved the torsion on the stabilizer bar.
Another thing that may be difficult is countering the rotation of the stud.

I made due with this ratcheting wrench and a small ratchet, 1/4" socket to turn the hex bit. I think the hex bit is a 3/16", but if you can find the proper torx size, it will do you much better than forcing it. Also, the ratcheting box makes this job a lot easier and faster.
The stabilizer bar links are as easy to install as they are to remove. The top ball joint even has a little bit of a taper on it to make shimmying it in that much simpler.
Throw that new Korean piece of crap back on (it literally says, "Made in Korean Republic of" on the bag), and enjoy another 20k or so miles of a mostly quiet suspension!
If you carefully read this guide for three hours and don't mind spending your own money, then the process should take less than an hour to do yourself.
Or if you're cheap, then its probably best to argue with the service writer until they finally agree to fixing it.
As a side note, I've found on some other posts that cruze links (including ISM's adjustable ones) should work on our cars. The center to center measurement is off by millimeters at most and under a centimeter.
Okay, here's the excerpt from my blog.
Ah, February. What a wonderful month (not really). Slowly, the days get longer and begins to warm us up for the coming of Spring. Time for a nice drive (commute) to work. WHAT THE F*CK IS ALL THAT STUPID NOISE???!?
Turns out from some research, a minority of Sonics suffer from sever stabilizer bar link problems. Either full opting the wheel or taking a corner at moderate speed (not even), they wear prematurely and start clanking and clinking like a piece o sh*t Korean car.
So, like any car guy, I bought the parts and set aside a weekend to work on it, today actually which kind of makes this a March post. The problem really made itself known in February however. Before that, even as recently as January, it was a noise that I only heard now and then.
Anyway, I just got home and I'm happy to report that the sound is completely gone and the problem alleviated. The following is a bunch of pictures and some light instruction if you find this problem happening to you.
On the left is the new one. Its a little hard to tell, but the used one on the right is nearly devoid of all grease on the lower ball joint with the upper going as well.
Did you decide to take it to your dealer to get it fixed? If you're wondering why it took 2+ hours, its likely this sh*tty ball joint stud. The torx part gets so dirty with rust, that's what made my job take so long. The upper ball joint that mounts to the strut doesn't get this bad. It might have to do with it being stainless.
Here's the top nut. The plastic ring in the center means its self locking. The bottom doesn't have this; it will however take a little bit of muscle to tighten it onto the stud. It may also be a self locking nut, but instead of a plastic ring, it uses an offset thread.
Here's where you'll find the stabilizer bar link, just aft of the wheel hub. It will be difficult to remove without a second jack if not impossible. The easiest way to remove it is to remove the top nut first. If you can't take it off, just get it loose until the ball joint stud ****s. Place the second jack under the lower control arm, preferably directly under the wheel hub. Jack it until you can freely move the threaded part. It should be much easier to remove after you've relieved the torsion on the stabilizer bar.
Another thing that may be difficult is countering the rotation of the stud.
I made due with this ratcheting wrench and a small ratchet, 1/4" socket to turn the hex bit. I think the hex bit is a 3/16", but if you can find the proper torx size, it will do you much better than forcing it. Also, the ratcheting box makes this job a lot easier and faster.
The stabilizer bar links are as easy to install as they are to remove. The top ball joint even has a little bit of a taper on it to make shimmying it in that much simpler.
Throw that new Korean piece of crap back on (it literally says, "Made in Korean Republic of" on the bag), and enjoy another 20k or so miles of a mostly quiet suspension!

")


