jayrq2o1
New member
After browsing the depths of this forum and finally finding some spare time between school work and messing with the Sonic on the weekend, I consolidate all that needs to be known here.
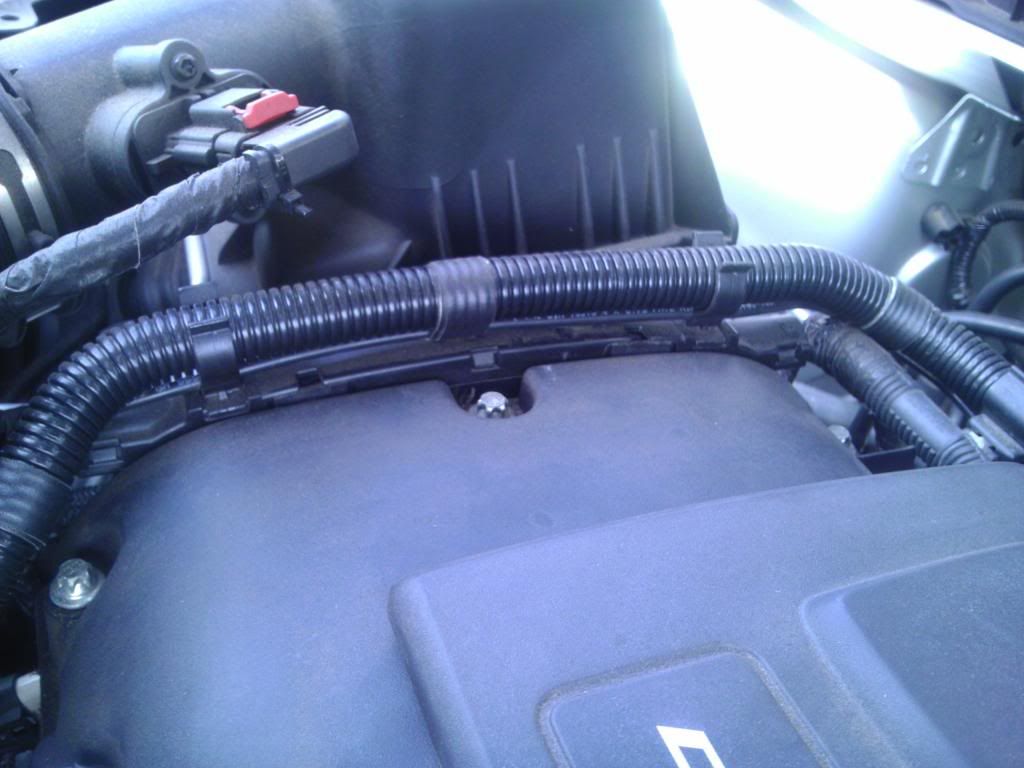
First, a look at the line you will be tapping. Since I was too lazy to circle it, I'll try to make due with a description.
Here's the general area we will be addressing. If you look carefully, you'll see the small 1/8" tube that hides behind the plastic shelled PCV line. The line in question is indeed hard and formed, but it is just flexible enough that installing a tee in this area should not damage it.
Originally, I was thinking of tapping the green and grey line originating below the intake manifold. I've read on cruzetalk and on a few posts here that this is where they do it on the cruze, but upon closer observation, it is much more difficult to access than the BPV line. You can always splice in a tee if you're willing to struggle under the manifold, but this solution that I originally found via Eric Smit will be much easier.
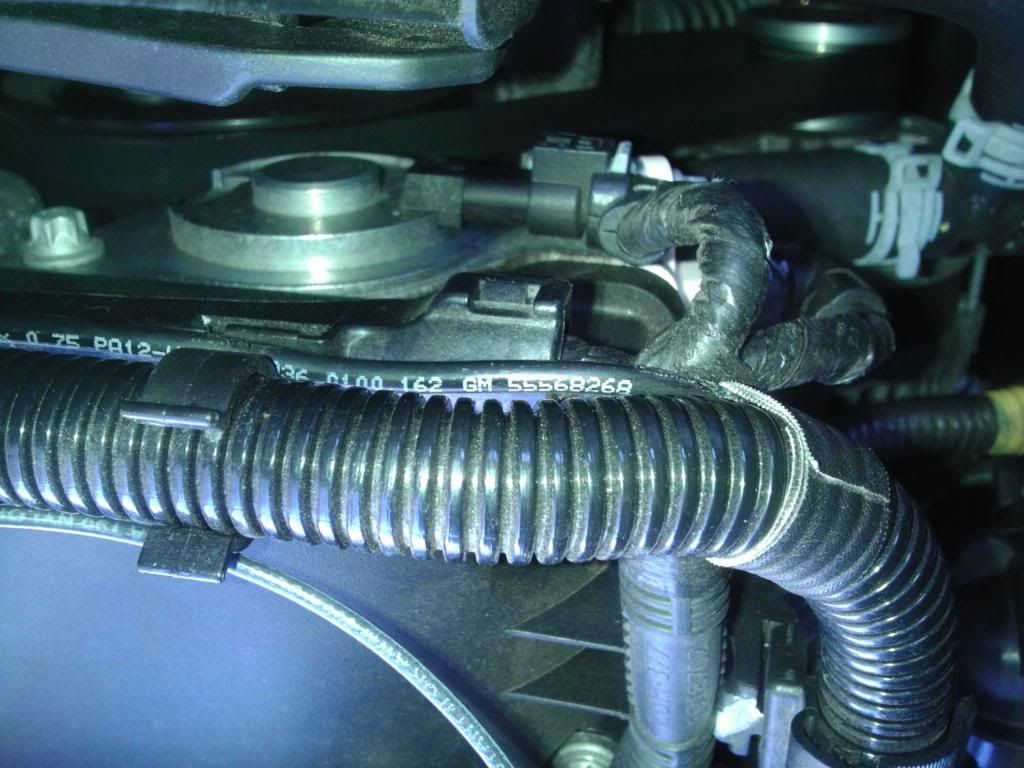
Did you somehow manage to break it? Need to buy a new one? Or, still can't find it? Its the tiny hose with this GM part number imprinted upon it. Hopefully, this helps you find the line we're talking about. Before cutting it in half and hoping the tee that came with your boost gauge fits, I suggest first going to an auto parts store and picking up some 1/4" windshield washer line and 1/4" spring clamps.
Another way, if you're willing to stop by a home improvement or hardware store is to use a 1/8" push to disconnect tee with one 1/4" port for the boost gauge. I was lucky enough that buried deep within the trash of obsolete stuff in the shop to find one 1/8" tee and a 1/8" to 1/4" male NPT.
Feel free to change the size of the hoses, tees and connectors to suit your boost gauge's requirements and personal preference.
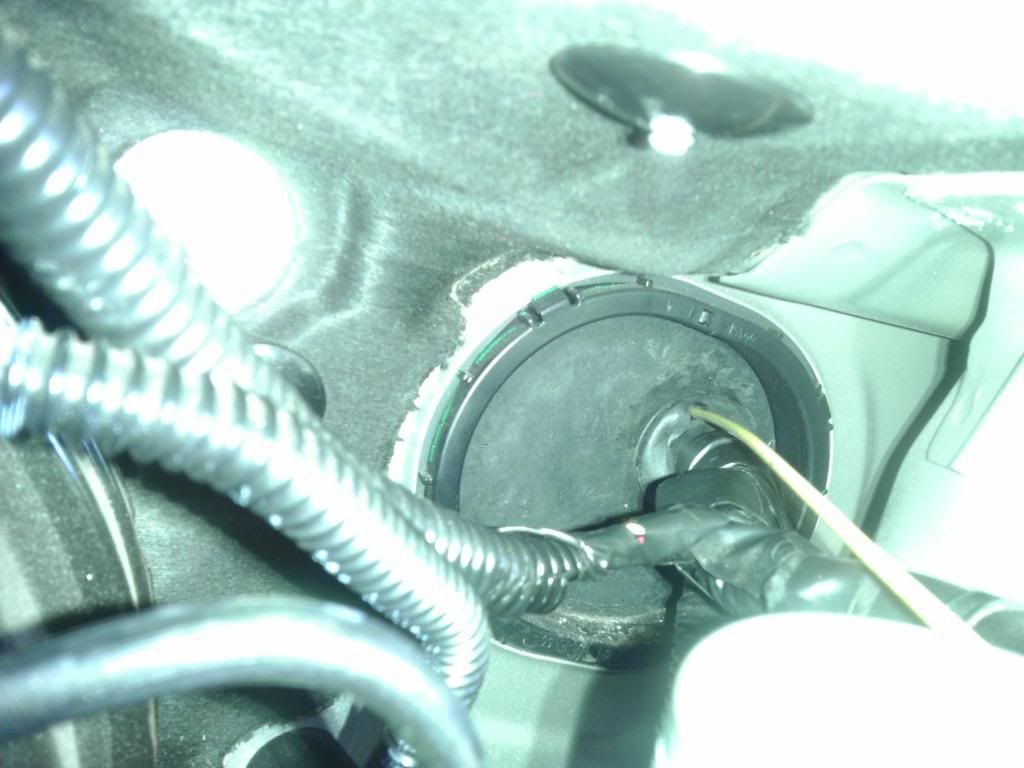
Now you may ask, where's best to break through the firewall? The answer is the main harness grommet on the driver side just right (facing the engine bay) of the brake booster. Inside the cabin, its easy enough to reach with a screwdriver and even easier to see what your doing with the fuse cover removed. I actually used a tire repair kits pointy tool to breach it with a wire taped to it for my initial fishing. Then cut your tubing at an angle to give it a point that will allow it to also break through the grommet. Tape it to your wire and fish the hose through; either way is fine, though I did mine from the engine bay pulling through the cabin. If you're scared that the soft pvc tubing that might have come with your boost gauge might collapse in the very tight grommet, you can either make a bigger hole or throw it away and buy some real hose. I'm lucky to be in a shop where I have access to all of the stuff we use on our machines, so I'm currently using a semi-flexible hose that should be good up to 200 deg F and resists kinks and collapsing. While it won't mean much under boost, you'll likely get a funky or non-read in vacuum at idle and think your car is broken.
As a word of advice, leaving the wire you used for fishing the hose through will be convenient for when you decide to either install water/methanol injection or a nitrous kit and need a 12v line that's only on with the ignition switch. Best way to do it, imho, is with a bussman "add a circuit" for ATM style fuses, available at your local auto parts store (mine was 6.99 at autozone) and plugging it into the fuse slot labeled "CIGAR APO." That should be your 12v accessory/cigarette lighter port.
If not for water/meth or nitrous, there's plenty of other things that a free wire to your engine bay can be good for. I just can't think of them right now.
And voila. A tapped vac/boost line in under an hour for less than 20 bucks.
For a boost gauge.
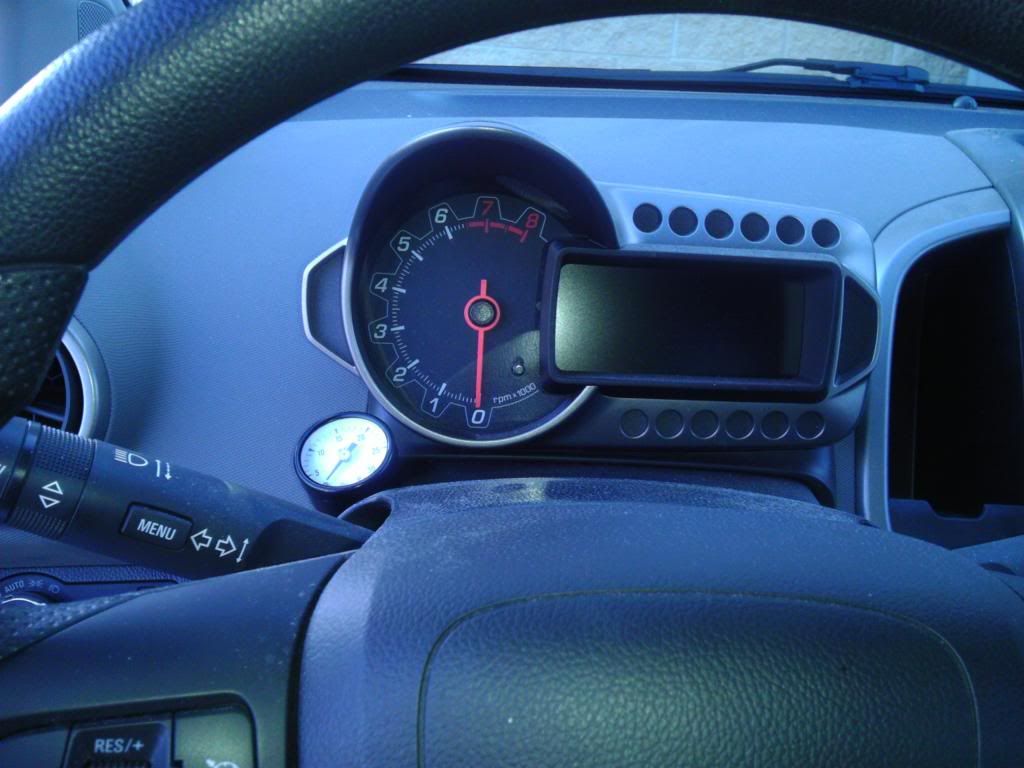
Now I'm just running 0-30 psi gauge I found in the shop, but I'll upgrade later to a glowshift or something. If you're wondering what the electrical lines are for, you can use that to light it up so the gauge is visible at night. Again, you can use a Bussman add a circuit to add a line for powering it, but it has been mentioned the proper place to tap it is the dimmer. This way, it will dim and brighten with your dashboard
Needless to say, I've stolen a lot of stuff from other members of the forum. If you stumble upon my post and remember being the first one to post about the material covered here, feel free to message me, and I'll add your name to the bottom of this as credit.
Credits/Sources:
Eric Smit
http://img.tapatalk.com/d/12/10/22/y3e9e2uq.jpg
http://img.tapatalk.com/d/12/10/22/7egamahu.jpg
dvn
http://i239.photobucket.com/albums/ff27/dvn01/boostt_zps885109ed.jpg
There's also a nice picture of an owner (nice title for us) that drilled and filed a hole into his dashboard and his gauge looks really clean, though every search for "gauge", "boost", "mount" have come up with nothin. If I find it later, I'll add it to the list of sources.
::EDIT::
And that clean gauge belongs to ras42tbss. Thanks!
First, a look at the line you will be tapping. Since I was too lazy to circle it, I'll try to make due with a description.
Here's the general area we will be addressing. If you look carefully, you'll see the small 1/8" tube that hides behind the plastic shelled PCV line. The line in question is indeed hard and formed, but it is just flexible enough that installing a tee in this area should not damage it.
Originally, I was thinking of tapping the green and grey line originating below the intake manifold. I've read on cruzetalk and on a few posts here that this is where they do it on the cruze, but upon closer observation, it is much more difficult to access than the BPV line. You can always splice in a tee if you're willing to struggle under the manifold, but this solution that I originally found via Eric Smit will be much easier.
Did you somehow manage to break it? Need to buy a new one? Or, still can't find it? Its the tiny hose with this GM part number imprinted upon it. Hopefully, this helps you find the line we're talking about. Before cutting it in half and hoping the tee that came with your boost gauge fits, I suggest first going to an auto parts store and picking up some 1/4" windshield washer line and 1/4" spring clamps.
Another way, if you're willing to stop by a home improvement or hardware store is to use a 1/8" push to disconnect tee with one 1/4" port for the boost gauge. I was lucky enough that buried deep within the trash of obsolete stuff in the shop to find one 1/8" tee and a 1/8" to 1/4" male NPT.
Feel free to change the size of the hoses, tees and connectors to suit your boost gauge's requirements and personal preference.
Now you may ask, where's best to break through the firewall? The answer is the main harness grommet on the driver side just right (facing the engine bay) of the brake booster. Inside the cabin, its easy enough to reach with a screwdriver and even easier to see what your doing with the fuse cover removed. I actually used a tire repair kits pointy tool to breach it with a wire taped to it for my initial fishing. Then cut your tubing at an angle to give it a point that will allow it to also break through the grommet. Tape it to your wire and fish the hose through; either way is fine, though I did mine from the engine bay pulling through the cabin. If you're scared that the soft pvc tubing that might have come with your boost gauge might collapse in the very tight grommet, you can either make a bigger hole or throw it away and buy some real hose. I'm lucky to be in a shop where I have access to all of the stuff we use on our machines, so I'm currently using a semi-flexible hose that should be good up to 200 deg F and resists kinks and collapsing. While it won't mean much under boost, you'll likely get a funky or non-read in vacuum at idle and think your car is broken.
As a word of advice, leaving the wire you used for fishing the hose through will be convenient for when you decide to either install water/methanol injection or a nitrous kit and need a 12v line that's only on with the ignition switch. Best way to do it, imho, is with a bussman "add a circuit" for ATM style fuses, available at your local auto parts store (mine was 6.99 at autozone) and plugging it into the fuse slot labeled "CIGAR APO." That should be your 12v accessory/cigarette lighter port.
If not for water/meth or nitrous, there's plenty of other things that a free wire to your engine bay can be good for. I just can't think of them right now.
And voila. A tapped vac/boost line in under an hour for less than 20 bucks.
For a boost gauge.
Now I'm just running 0-30 psi gauge I found in the shop, but I'll upgrade later to a glowshift or something. If you're wondering what the electrical lines are for, you can use that to light it up so the gauge is visible at night. Again, you can use a Bussman add a circuit to add a line for powering it, but it has been mentioned the proper place to tap it is the dimmer. This way, it will dim and brighten with your dashboard
Needless to say, I've stolen a lot of stuff from other members of the forum. If you stumble upon my post and remember being the first one to post about the material covered here, feel free to message me, and I'll add your name to the bottom of this as credit.
Credits/Sources:
Eric Smit
http://img.tapatalk.com/d/12/10/22/y3e9e2uq.jpg
http://img.tapatalk.com/d/12/10/22/7egamahu.jpg
dvn
http://i239.photobucket.com/albums/ff27/dvn01/boostt_zps885109ed.jpg
There's also a nice picture of an owner (nice title for us) that drilled and filed a hole into his dashboard and his gauge looks really clean, though every search for "gauge", "boost", "mount" have come up with nothin. If I find it later, I'll add it to the list of sources.
::EDIT::
And that clean gauge belongs to ras42tbss. Thanks!
Last edited:

